Arpeggios and broken chords
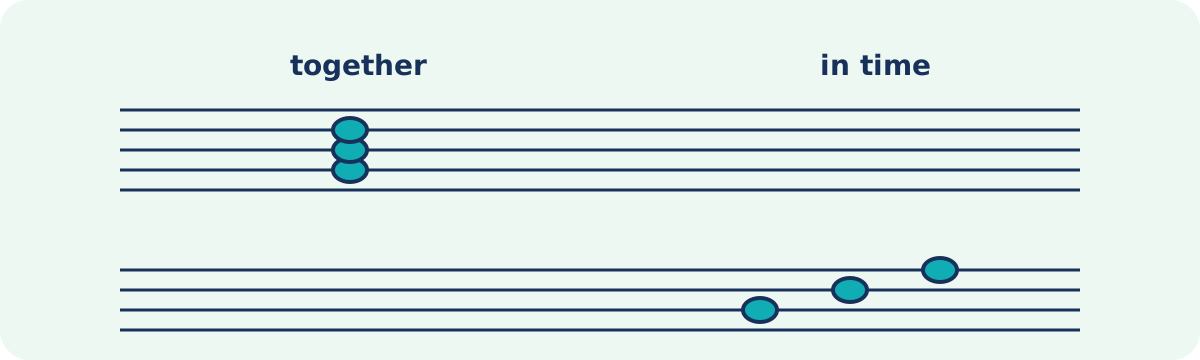
Arpeggios and broken chords: a complete practical guide
An arpeggio is not a trick but a way to see a chord in time. This deliberately large demonstration article combines theory, technique, ear training and keyboard practice. It is also a visual test of long scrolling, a complete table of contents, anchors, lists, warnings, quotations and tables.
Read the sections in order, then return to difficult places through the table of contents.
How to use this guide
This article works well for a calm 15–30 minute session. Read an explanation, play a short example, then check it in the trainer. Do not increase the tempo only to chase a number: clean, relaxed motion matters more than speed.
A quick route
- Find the chord tones.
- Play them together.
- Spread the tones one by one.
- Repeat the pattern at another tempo.
| Stage | Goal | Ready when |
| Listening | Recognize the tones | You can name them before playing |
| Slow work | Keep the shape | Three even repetitions |
| Tempo | Keep the pulse | No rushing at the end |
1. How an arpeggio is built
An arpeggio keeps the chord tones but turns a vertical gesture into horizontal motion.
Practice sequence 1
- Name the tones and intervals before starting.
- Play the pattern slowly and listen to every key.
- Repeat it without stopping and record one control take.
What to check at the end 1
- The wrist stays free.
- The thumb does not collapse into the key.
- The final tone does not rush.
A small rule: first make the sound consistent, then add speed.
| Observation | Student question | Next step |
| Sound | Is every tone equally clear? | Reduce tempo |
| Rhythm | Does the pulse stay stable? | Add a metronome |
| Motion | Does the hand stay relaxed? | Take a break |
2. Hand position
Before starting, check a loose wrist, rounded fingers and the absence of unnecessary tension.
Practice sequence 2
- Name the tones and intervals before starting.
- Play the pattern slowly and listen to every key.
- Repeat it without stopping and record one control take.
What to check at the end 2
- The wrist stays free.
- The thumb does not collapse into the key.
- The final tone does not rush.
A small rule: first make the sound consistent, then add speed.
| Observation | Student question | Next step |
| Sound | Is every tone equally clear? | Reduce tempo |
| Rhythm | Does the pulse stay stable? | Add a metronome |
| Motion | Does the hand stay relaxed? | Take a break |
3. Root position
In root position the tones are stacked from the root through the third to the fifth.
Practice sequence 3
- Name the tones and intervals before starting.
- Play the pattern slowly and listen to every key.
- Repeat it without stopping and record one control take.
What to check at the end 3
- The wrist stays free.
- The thumb does not collapse into the key.
- The final tone does not rush.
A small rule: first make the sound consistent, then add speed.
| Observation | Student question | Next step |
| Sound | Is every tone equally clear? | Reduce tempo |
| Rhythm | Does the pulse stay stable? | Add a metronome |
| Motion | Does the hand stay relaxed? | Take a break |
4. Inversions
An inversion changes the bottom note without changing the pitch collection. This gives more fingering choices.
Practice sequence 4
- Name the tones and intervals before starting.
- Play the pattern slowly and listen to every key.
- Repeat it without stopping and record one control take.
What to check at the end 4
- The wrist stays free.
- The thumb does not collapse into the key.
- The final tone does not rush.
A small rule: first make the sound consistent, then add speed.
| Observation | Student question | Next step |
| Sound | Is every tone equally clear? | Reduce tempo |
| Rhythm | Does the pulse stay stable? | Add a metronome |
| Motion | Does the hand stay relaxed? | Take a break |
5. Major triad
Build the major triad together first, then spread it into an even broken pattern.
Practice sequence 5
- Name the tones and intervals before starting.
- Play the pattern slowly and listen to every key.
- Repeat it without stopping and record one control take.
What to check at the end 5
- The wrist stays free.
- The thumb does not collapse into the key.
- The final tone does not rush.
A small rule: first make the sound consistent, then add speed.
| Observation | Student question | Next step |
| Sound | Is every tone equally clear? | Reduce tempo |
| Rhythm | Does the pulse stay stable? | Add a metronome |
| Motion | Does the hand stay relaxed? | Take a break |
6. Minor triad
Compare the minor and major third. The keyboard distance is small, but the sound is clear.
Practice sequence 6
- Name the tones and intervals before starting.
- Play the pattern slowly and listen to every key.
- Repeat it without stopping and record one control take.
What to check at the end 6
- The wrist stays free.
- The thumb does not collapse into the key.
- The final tone does not rush.
A small rule: first make the sound consistent, then add speed.
| Observation | Student question | Next step |
| Sound | Is every tone equally clear? | Reduce tempo |
| Rhythm | Does the pulse stay stable? | Add a metronome |
| Motion | Does the hand stay relaxed? | Take a break |
7. Diminished and augmented forms
Do not rush complex shapes: name the intervals first and feel their symmetry.
Practice sequence 7
- Name the tones and intervals before starting.
- Play the pattern slowly and listen to every key.
- Repeat it without stopping and record one control take.
What to check at the end 7
- The wrist stays free.
- The thumb does not collapse into the key.
- The final tone does not rush.
A small rule: first make the sound consistent, then add speed.
| Observation | Student question | Next step |
| Sound | Is every tone equally clear? | Reduce tempo |
| Rhythm | Does the pulse stay stable? | Add a metronome |
| Motion | Does the hand stay relaxed? | Take a break |
8. Crossing the octave
In a wide arpeggio the thumb passes under the hand or the hand changes position smoothly.
Practice sequence 8
- Name the tones and intervals before starting.
- Play the pattern slowly and listen to every key.
- Repeat it without stopping and record one control take.
What to check at the end 8
- The wrist stays free.
- The thumb does not collapse into the key.
- The final tone does not rush.
A small rule: first make the sound consistent, then add speed.
| Observation | Student question | Next step |
| Sound | Is every tone equally clear? | Reduce tempo |
| Rhythm | Does the pulse stay stable? | Add a metronome |
| Motion | Does the hand stay relaxed? | Take a break |
9. Right-hand fingering
The same pattern should remain recognizable in different keys, even when fingering changes slightly.
Practice sequence 9
- Name the tones and intervals before starting.
- Play the pattern slowly and listen to every key.
- Repeat it without stopping and record one control take.
What to check at the end 9
- The wrist stays free.
- The thumb does not collapse into the key.
- The final tone does not rush.
A small rule: first make the sound consistent, then add speed.
| Observation | Student question | Next step |
| Sound | Is every tone equally clear? | Reduce tempo |
| Rhythm | Does the pulse stay stable? | Add a metronome |
| Motion | Does the hand stay relaxed? | Take a break |
10. Left-hand fingering
The left hand often moves as a mirror, so check direction and anchor fingers separately.
Practice sequence 10
- Name the tones and intervals before starting.
- Play the pattern slowly and listen to every key.
- Repeat it without stopping and record one control take.
What to check at the end 10
- The wrist stays free.
- The thumb does not collapse into the key.
- The final tone does not rush.
A small rule: first make the sound consistent, then add speed.
| Observation | Student question | Next step |
| Sound | Is every tone equally clear? | Reduce tempo |
| Rhythm | Does the pulse stay stable? | Add a metronome |
| Motion | Does the hand stay relaxed? | Take a break |
11. Steady pulse
Evenness matters more than speed. Count aloud and do not rush the last note of a group.
Practice sequence 11
- Name the tones and intervals before starting.
- Play the pattern slowly and listen to every key.
- Repeat it without stopping and record one control take.
What to check at the end 11
- The wrist stays free.
- The thumb does not collapse into the key.
- The final tone does not rush.
A small rule: first make the sound consistent, then add speed.
| Observation | Student question | Next step |
| Sound | Is every tone equally clear? | Reduce tempo |
| Rhythm | Does the pulse stay stable? | Add a metronome |
| Motion | Does the hand stay relaxed? | Take a break |
12. Accent and phrase direction
Do not turn every first note into a heavy hit. Look for a longer musical line.
Practice sequence 12
- Name the tones and intervals before starting.
- Play the pattern slowly and listen to every key.
- Repeat it without stopping and record one control take.
What to check at the end 12
- The wrist stays free.
- The thumb does not collapse into the key.
- The final tone does not rush.
A small rule: first make the sound consistent, then add speed.
| Observation | Student question | Next step |
| Sound | Is every tone equally clear? | Reduce tempo |
| Rhythm | Does the pulse stay stable? | Add a metronome |
| Motion | Does the hand stay relaxed? | Take a break |
13. Legato
Connect the tones with the fingers while keeping a soft wrist motion and an even key depth.
Practice sequence 13
- Name the tones and intervals before starting.
- Play the pattern slowly and listen to every key.
- Repeat it without stopping and record one control take.
What to check at the end 13
- The wrist stays free.
- The thumb does not collapse into the key.
- The final tone does not rush.
A small rule: first make the sound consistent, then add speed.
| Observation | Student question | Next step |
| Sound | Is every tone equally clear? | Reduce tempo |
| Rhythm | Does the pulse stay stable? | Add a metronome |
| Motion | Does the hand stay relaxed? | Take a break |
14. Staccato
A short sound does not mean a hard hit. Lift quickly while keeping the touch light.
Practice sequence 14
- Name the tones and intervals before starting.
- Play the pattern slowly and listen to every key.
- Repeat it without stopping and record one control take.
What to check at the end 14
- The wrist stays free.
- The thumb does not collapse into the key.
- The final tone does not rush.
A small rule: first make the sound consistent, then add speed.
| Observation | Student question | Next step |
| Sound | Is every tone equally clear? | Reduce tempo |
| Rhythm | Does the pulse stay stable? | Add a metronome |
| Motion | Does the hand stay relaxed? | Take a break |
15. Dynamics
Play the same pattern softly, moderately and loudly without changing the tempo.
Practice sequence 15
- Name the tones and intervals before starting.
- Play the pattern slowly and listen to every key.
- Repeat it without stopping and record one control take.
What to check at the end 15
- The wrist stays free.
- The thumb does not collapse into the key.
- The final tone does not rush.
A small rule: first make the sound consistent, then add speed.
| Observation | Student question | Next step |
| Sound | Is every tone equally clear? | Reduce tempo |
| Rhythm | Does the pulse stay stable? | Add a metronome |
| Motion | Does the hand stay relaxed? | Take a break |
16. Pedal
The pedal connects harmony but should not hide every separate note of the pattern.
Practice sequence 16
- Name the tones and intervals before starting.
- Play the pattern slowly and listen to every key.
- Repeat it without stopping and record one control take.
What to check at the end 16
- The wrist stays free.
- The thumb does not collapse into the key.
- The final tone does not rush.
A small rule: first make the sound consistent, then add speed.
| Observation | Student question | Next step |
| Sound | Is every tone equally clear? | Reduce tempo |
| Rhythm | Does the pulse stay stable? | Add a metronome |
| Motion | Does the hand stay relaxed? | Take a break |
17. Rhythmic variations
Alternate long and short notes to strengthen finger control instead of memorizing a mechanical motion.
Practice sequence 17
- Name the tones and intervals before starting.
- Play the pattern slowly and listen to every key.
- Repeat it without stopping and record one control take.
What to check at the end 17
- The wrist stays free.
- The thumb does not collapse into the key.
- The final tone does not rush.
A small rule: first make the sound consistent, then add speed.
| Observation | Student question | Next step |
| Sound | Is every tone equally clear? | Reduce tempo |
| Rhythm | Does the pulse stay stable? | Add a metronome |
| Motion | Does the hand stay relaxed? | Take a break |
18. Groups of four
Groups of four help maintain the meter and reveal the position change.
Practice sequence 18
- Name the tones and intervals before starting.
- Play the pattern slowly and listen to every key.
- Repeat it without stopping and record one control take.
What to check at the end 18
- The wrist stays free.
- The thumb does not collapse into the key.
- The final tone does not rush.
A small rule: first make the sound consistent, then add speed.
| Observation | Student question | Next step |
| Sound | Is every tone equally clear? | Reduce tempo |
| Rhythm | Does the pulse stay stable? | Add a metronome |
| Motion | Does the hand stay relaxed? | Take a break |
19. Groups of three
Triplets are useful in 6/8 and in exercises where chord tones repeat cyclically.
Practice sequence 19
- Name the tones and intervals before starting.
- Play the pattern slowly and listen to every key.
- Repeat it without stopping and record one control take.
What to check at the end 19
- The wrist stays free.
- The thumb does not collapse into the key.
- The final tone does not rush.
A small rule: first make the sound consistent, then add speed.
| Observation | Student question | Next step |
| Sound | Is every tone equally clear? | Reduce tempo |
| Rhythm | Does the pulse stay stable? | Add a metronome |
| Motion | Does the hand stay relaxed? | Take a break |
20. Slow checking
At a slow speed it is easier to notice an uneven finger, extra motion or a wrong note.
Practice sequence 20
- Name the tones and intervals before starting.
- Play the pattern slowly and listen to every key.
- Repeat it without stopping and record one control take.
What to check at the end 20
- The wrist stays free.
- The thumb does not collapse into the key.
- The final tone does not rush.
A small rule: first make the sound consistent, then add speed.
| Observation | Student question | Next step |
| Sound | Is every tone equally clear? | Reduce tempo |
| Rhythm | Does the pulse stay stable? | Add a metronome |
| Motion | Does the hand stay relaxed? | Take a break |
21. Working with a metronome
Start at a tempo where you can make three equal repetitions without stopping.
Practice sequence 21
- Name the tones and intervals before starting.
- Play the pattern slowly and listen to every key.
- Repeat it without stopping and record one control take.
What to check at the end 21
- The wrist stays free.
- The thumb does not collapse into the key.
- The final tone does not rush.
A small rule: first make the sound consistent, then add speed.
| Observation | Student question | Next step |
| Sound | Is every tone equally clear? | Reduce tempo |
| Rhythm | Does the pulse stay stable? | Add a metronome |
| Motion | Does the hand stay relaxed? | Take a break |
22. Recording a performance
Record a short take and check not only errors, but also the evenness of the gaps between tones.
Practice sequence 22
- Name the tones and intervals before starting.
- Play the pattern slowly and listen to every key.
- Repeat it without stopping and record one control take.
What to check at the end 22
- The wrist stays free.
- The thumb does not collapse into the key.
- The final tone does not rush.
A small rule: first make the sound consistent, then add speed.
| Observation | Student question | Next step |
| Sound | Is every tone equally clear? | Reduce tempo |
| Rhythm | Does the pulse stay stable? | Add a metronome |
| Motion | Does the hand stay relaxed? | Take a break |
23. Sight-reading
Read the clef, key and meter first, then imagine the motion before the first tone.
Practice sequence 23
- Name the tones and intervals before starting.
- Play the pattern slowly and listen to every key.
- Repeat it without stopping and record one control take.
What to check at the end 23
- The wrist stays free.
- The thumb does not collapse into the key.
- The final tone does not rush.
A small rule: first make the sound consistent, then add speed.
| Observation | Student question | Next step |
| Sound | Is every tone equally clear? | Reduce tempo |
| Rhythm | Does the pulse stay stable? | Add a metronome |
| Motion | Does the hand stay relaxed? | Take a break |
24. Transposition
Move a simple pattern to a neighboring key while keeping its interval formula.
Practice sequence 24
- Name the tones and intervals before starting.
- Play the pattern slowly and listen to every key.
- Repeat it without stopping and record one control take.
What to check at the end 24
- The wrist stays free.
- The thumb does not collapse into the key.
- The final tone does not rush.
A small rule: first make the sound consistent, then add speed.
| Observation | Student question | Next step |
| Sound | Is every tone equally clear? | Reduce tempo |
| Rhythm | Does the pulse stay stable? | Add a metronome |
| Motion | Does the hand stay relaxed? | Take a break |
25. Two-hand arpeggios
Start with a slow unison, then add contrary motion and position changes.
Practice sequence 25
- Name the tones and intervals before starting.
- Play the pattern slowly and listen to every key.
- Repeat it without stopping and record one control take.
What to check at the end 25
- The wrist stays free.
- The thumb does not collapse into the key.
- The final tone does not rush.
A small rule: first make the sound consistent, then add speed.
| Observation | Student question | Next step |
| Sound | Is every tone equally clear? | Reduce tempo |
| Rhythm | Does the pulse stay stable? | Add a metronome |
| Motion | Does the hand stay relaxed? | Take a break |
26. Hand synchronization
Align harmonic changes first, then let each hand breathe freely inside the group.
Practice sequence 26
- Name the tones and intervals before starting.
- Play the pattern slowly and listen to every key.
- Repeat it without stopping and record one control take.
What to check at the end 26
- The wrist stays free.
- The thumb does not collapse into the key.
- The final tone does not rush.
A small rule: first make the sound consistent, then add speed.
| Observation | Student question | Next step |
| Sound | Is every tone equally clear? | Reduce tempo |
| Rhythm | Does the pulse stay stable? | Add a metronome |
| Motion | Does the hand stay relaxed? | Take a break |
27. Common mistakes
The most common problems are a tense wrist, rushing, accidental accents and playing beyond readiness.
Practice sequence 27
- Name the tones and intervals before starting.
- Play the pattern slowly and listen to every key.
- Repeat it without stopping and record one control take.
What to check at the end 27
- The wrist stays free.
- The thumb does not collapse into the key.
- The final tone does not rush.
A small rule: first make the sound consistent, then add speed.
| Observation | Student question | Next step |
| Sound | Is every tone equally clear? | Reduce tempo |
| Rhythm | Does the pulse stay stable? | Add a metronome |
| Motion | Does the hand stay relaxed? | Take a break |
28. Practice plan
Split the work into reading, slow repetitions, one control take and a short record of the result.
Practice sequence 28
- Name the tones and intervals before starting.
- Play the pattern slowly and listen to every key.
- Repeat it without stopping and record one control take.
What to check at the end 28
- The wrist stays free.
- The thumb does not collapse into the key.
- The final tone does not rush.
A small rule: first make the sound consistent, then add speed.
| Observation | Student question | Next step |
| Sound | Is every tone equally clear? | Reduce tempo |
| Rhythm | Does the pulse stay stable? | Add a metronome |
| Motion | Does the hand stay relaxed? | Take a break |
29. Connection to the trainer
In the trainer you can check each note, chord accuracy and rhythmic stability separately.
Practice sequence 29
- Name the tones and intervals before starting.
- Play the pattern slowly and listen to every key.
- Repeat it without stopping and record one control take.
What to check at the end 29
- The wrist stays free.
- The thumb does not collapse into the key.
- The final tone does not rush.
A small rule: first make the sound consistent, then add speed.
| Observation | Student question | Next step |
| Sound | Is every tone equally clear? | Reduce tempo |
| Rhythm | Does the pulse stay stable? | Add a metronome |
| Motion | Does the hand stay relaxed? | Take a break |
30. Reading the result
The percentage of correct notes is only one measure. Also look at tempo stability and repeated errors.
Practice sequence 30
- Name the tones and intervals before starting.
- Play the pattern slowly and listen to every key.
- Repeat it without stopping and record one control take.
What to check at the end 30
- The wrist stays free.
- The thumb does not collapse into the key.
- The final tone does not rush.
A small rule: first make the sound consistent, then add speed.
| Observation | Student question | Next step |
| Sound | Is every tone equally clear? | Reduce tempo |
| Rhythm | Does the pulse stay stable? | Add a metronome |
| Motion | Does the hand stay relaxed? | Take a break |
31. Mini project
Create a short four-chord progression and play it at three tempos.
Practice sequence 31
- Name the tones and intervals before starting.
- Play the pattern slowly and listen to every key.
- Repeat it without stopping and record one control take.
What to check at the end 31
- The wrist stays free.
- The thumb does not collapse into the key.
- The final tone does not rush.
A small rule: first make the sound consistent, then add speed.
| Observation | Student question | Next step |
| Sound | Is every tone equally clear? | Reduce tempo |
| Rhythm | Does the pulse stay stable? | Add a metronome |
| Motion | Does the hand stay relaxed? | Take a break |
32. Final check
A good arpeggio sounds even, clear and musical. It should not be merely a fast collection of keys.
Practice sequence 32
- Name the tones and intervals before starting.
- Play the pattern slowly and listen to every key.
- Repeat it without stopping and record one control take.
What to check at the end 32
- The wrist stays free.
- The thumb does not collapse into the key.
- The final tone does not rush.
A small rule: first make the sound consistent, then add speed.
| Observation | Student question | Next step |
| Sound | Is every tone equally clear? | Reduce tempo |
| Rhythm | Does the pulse stay stable? | Add a metronome |
| Motion | Does the hand stay relaxed? | Take a break |
Final reminder
- Listen not only for correctness but also for tone quality.
- Practise the right and left hands separately.
- Return to a slow tempo after every mistake.
Final checklist
- I know the chord tones.
- I understand the direction of motion.
- I can play the pattern slowly and evenly.
- I can explain what needs improvement.
Sources and licenses
- Open Music Theory, Version 2 — Virtual Library of Virginia / contributing authorsCC BY-SA 4.0; adapted explanation with attribution
- Theory Lessons — musictheory.netExternal reference; no text or images copied